As you can see, this is not Diary of the noob any more. Occasionally I will do a post about 3D printer and 3D printing. Practical stuff mainly.
MOSFET upgrade
Most cheap printers, including my Wanhaoo i3, have a problem that is not obvious and maybe will never occur, but if it did, it could have dire consequences. The problem is that all the power goes through main board to main power consumers - hot end of the nozzle and hot bed. Hot end works on higher temperature, but its smaller, so hot bed is main consumer of the power from main board. Consequence of this is that connection where hot bed wires are screwed to the main board had to endure high temperatures. Tease connectors on cheaper boards/3D printers are not declared for high temperatures. If you are printing some small objects/short time jobs just with PLA - you probably will never have any problem. But in cold winter night, while you printer is in 27 hour of printing ABS - it could burst in to the flames. That's the worst case scenario. Best case - you will have to buy new main board. So, the MOSFET is here to help. The thing MOSFET does is to take power from power source and provide it directly to consumer, using the connection on main board just for commands. MOSFET could be installed inside or out side of main boards box. I like my thing tidy so I opted for inside installation.
With few bigger prints in front of me, I made a decision to install MOSFET that arrived from China few weeks ago. I bought the rest of material, printed MOSFET base and fully relaxed approached the task.
 |
| Everything is ready for installation |
As a guide I used a great
post on That Nerd Channel blog. It is very informative and illustrative, with lots of pictures.
My main idea was not to move 3D printer, so I would not have to realign axis and to do basic bed leveling again. Nice circumstance was that I had just enough table area to do the job. I disabled control box, per guide, and then looked at steps laying ahead. I have fairly big hands that are known to feel unpleasant in contained space, so I slightly changed the procedure, to do everything I could before putting MOSFET inside box (screwing it to base, and connecting power supply wires to it).
 |
| MOSFET assembly |
Putting MOSFET with is base below main board was a little bit of a problem because of the my hands and fact that MOSFET base is such a snug fit.
 |
| MOSFET in place (behind all those cables) |
Main thing with MOSFET upgrade is not to mix up + and - wires. And here we come to an interesting situation - I even ordered MOSFET from the same manufacturer as in blog post, but my control wires were switched, so I had to be extra careful not to mix them up. On one side of control wires mount on MOSFET board there is a little + that can help you navigate tease murky waters. After that I connected rest of the wires and it was time to try out MOSFET before resembling everything. This is the risky part of operation because all electronics are open and you have to be careful not to make some short circuits.
 |
| Blue LED signals that MOSFET is working |
I switched on control box, give command to bed to heat up to 60 degree, and everything worked just fine.Feeling pretty good I resembled the control box (putting all the wires including new ones is not easy but it is duable). Lately I realized that I did not screw down the main board as tightly as it could be.
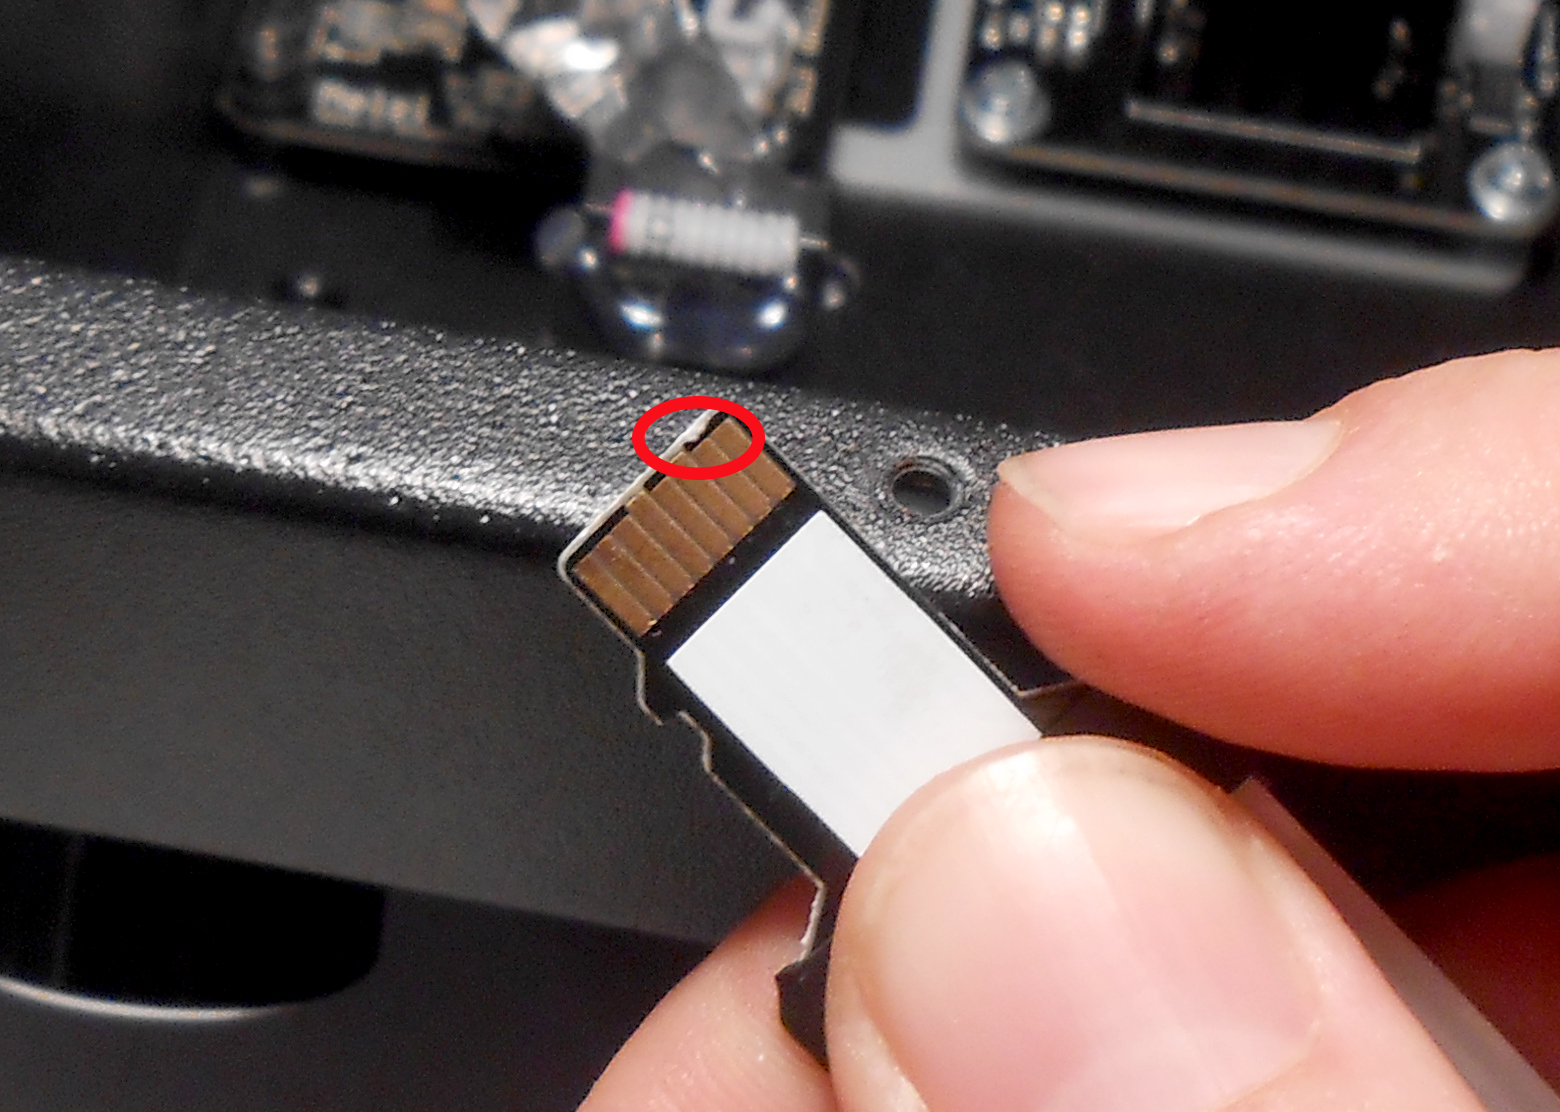
Eager to put, now fire proof, machine to work, I tried to insert SD card in its slot but then I realized that the slot is little lower than it was. With little effort SD card was in its place and I turned machine on. Looking in LCD screen I realized that SD card is not mounted. Giving command to mount card did not produce any result. Taking out the card from my mobile, trying with micro SD to SD cord did not produce any result either. My post on i3 facebook group run in to the wall of slience. Desperate measures were in order. I disassembled control box again. Looking into SD card port I could not find any pin loose. I tightened the screws on the main board and now it was the time to look inside the SD port. By a glance - nothing wrong, but I took the photo with slight zoom. On the photo it seemed that one pin (second from the right) was deformed.
 |
| Deformed pin is second one from the right, on this photo is only one with golden color. |
Using
hobby knife blade I tried to straight it up, hour or two latter, it still was not
perfect. So I made little dent on SD card in front of that pin. That
finally solved the problem.
 |
| Small dent made by my hobby knife finalized the problem solution |
Searching the internet I found that the problem with SD card is a common one. Probably the SD port is not of the best quality so even a small misshapen will deform the pins. In my case, slightly lower position of port (because I did not properly screw down the main board) was enough to deform one pin (putting an SD extension cord
for the first time does not help either,because it does not have a slight wedge on its end like the SD card does).
Moral of this story is that you have to pay attention to the smallest details.
Today printer is back in full throttle ejecting piece by piece of terrain.


Comments
Post a Comment